第七届NVIDIA Sky Hackathon项目报告书
系列文章目录
数据集收集和标注情况
进行模型的训练
在Jetson平台进行部署和推理
优化UI界面
1. 数据集收集和标注情况 1.1ASR语音数据集收集和标注情况 首先收集语音数据集,包含以下语音:
请检测出果皮
请检测出瓶子
请检测出纸箱
请检测出纸箱和果皮
请检测出果皮和纸箱
请检测出纸箱果皮和瓶子
请检测出果皮纸箱和瓶子
请检测出果皮瓶子和纸箱
请检测出纸箱瓶子和果皮
请检测出瓶子果皮和纸箱
请检测出果皮和瓶子
请检测出瓶子纸箱和果皮
请检测出瓶子和果皮
请检测出纸箱和瓶子
请检测出瓶子和纸箱
数据集类型以及数量
数据集类型
语音数量
测试集
111条男声+75条女声
训练集
221条(男+女)
通过librosa计算语音时长
1
2
asr_result = quartznet.transcribe(paths2audio_files=["xxx" ]) print (asr_result)
制作好训练集的json文件和测试集的json文件
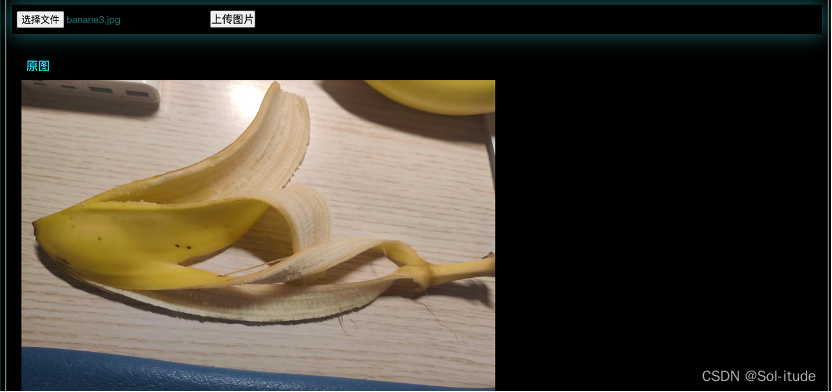
1.2CV图像数据集收集和标注情况 收集箱子图片200+,瓶子图片100+,香蕉皮图片100+
1 2 3 4 5 6 7 8 9 10 11 12 13 14 15 16 17 18 19 20 21 22 23 24 25 26 27 28 29 30 31 32 33 34 35 36 37 38 39 40 41 42 43 44 45 46 47 48 49 50 51 52 53 54 55 56 57 58 59 60 61 62 63 64 65 66 67 68 69 70 71 72 73 74 75 76 77 78 79 80 81 82 83 84 85 86 87 88 89 90 91 92 93 94 import sys from os import listdir from os.path import isfile, isdir, join , dirname , splitext, basename import xml.etree.ElementTree as ET path="" class XMLReader: def __init__(self, path): file = open(path, 'r' ) self.path = path self.content = file.read() self.root = ET.fromstring(self.content) self.template = "{name} 0.00 0 0.0 {xmin}.00 {ymin}.00 {xmax}.00 {ymax}.00 0.0 0.0 0.0 0.0 0.0 0.0 0.0" def get_filename(self): return splitext(basename (self.path))[0] def get_dir(self): return dirname (self.path) def get_objects(self): objects = [] for object in self.root.findall("object" ): objects.append({ "name" : object.find("name" ).text, "xmin" : object.find("bndbox" ).find("xmin" ).text, "ymin" : object.find("bndbox" ).find("ymin" ).text, "xmax" : object.find("bndbox" ).find("xmax" ).text, "ymax" : object.find("bndbox" ).find("ymax" ).text }) return objects def fill_template(self, object): return self.template.format(**object) def export_kitti(self): objects = self.get_objects() if len(objects) == 0: return False file = open(join (self.get_dir(), self.get_filename()) + ".txt" , 'w' ) for object in objects[:-1]: file.write(self.fill_template(object) + "\n" ) file.write(self.fill_template(objects[-1])) file.close() return True def process_file(path): xml_reader = XMLReader(path) return xml_reader.export_kitti() def get_directory_xml_files(dir ): return [join (dir , f) for f in listdir(dir ) if isfile(join (dir , f)) and splitext(f)[1].lower() == ".xml" ] def check_argv(argv): return len(argv) > 1 def main(): if not check_argv(sys.argv): print ("Wrong arguments. You should specify xml files or directory with xml files" ) args = sys.argv[1:] processed_file_count = 0 for path in args: files = [] if isfile(path): files.append(path) elif isdir(path): files += get_directory_xml_files(path) for file in files: if process_file(file): processed_file_count += 1 print ("Finished. {0} Files are processed" .format(processed_file_count)) if __name__ == "__main__" : main()
2.进行模型的训练 2.1进行ASR模型的训练 导入相关包和yaml文件后进行训练,在yaml文件中修改batch_size和数据集路径等
2.2进行CV模型的训练 在CV模型的训练中,最主要的是完成数据集的加载以及模型训练时参数的设置
1
2
3
4
5
6
7
8
9
10
11
12
training_config { batch_size_per_gpu: 8 num_epochs: 80 enable_qat: false learning_rate { soft_start_annealing_schedule { min_learning_rate: 5e-5 max_learning_rate: 2e-3 soft_start: 0.15 annealing: 0.8 } }
我们修改了学习率为0.002,并且有80个epochs,最后将训练的模型进行剪枝
注意!!!
3.在Jetson平台进行部署和推理 3.1部署和推理ASR模型 将本地保存好的nemo模型上传到节点
1 nemo_asr.models.EncDecCTCModel.restore_from("/home/nvidia/7th_ASR/7th_asr_model_best.nemo" )
启动flask服务后进入前端的界面
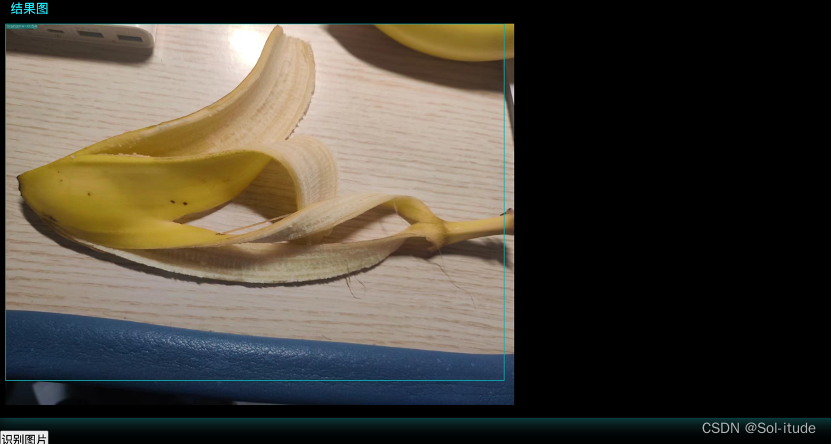
3.2部署和推理CV模型 需要在garbage_detection.py文件中修改自己模型的路径和名字
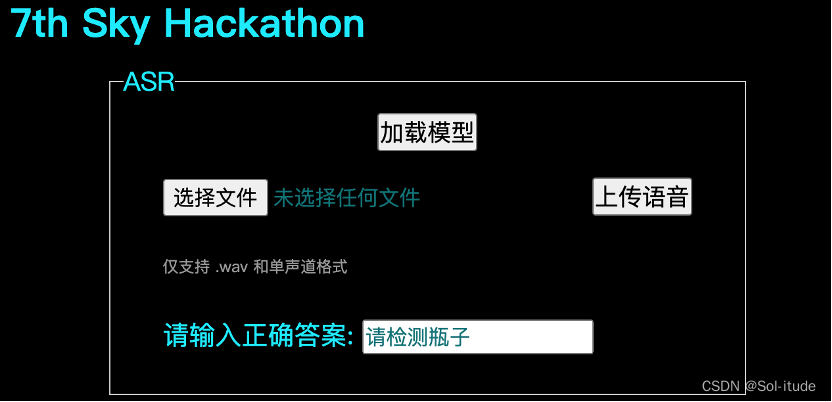
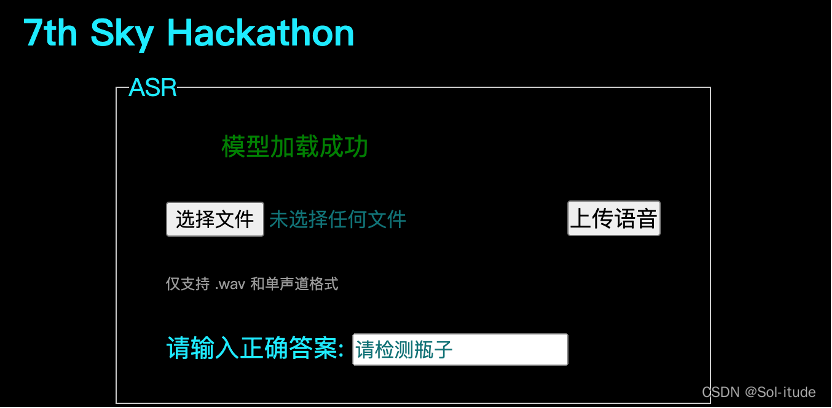
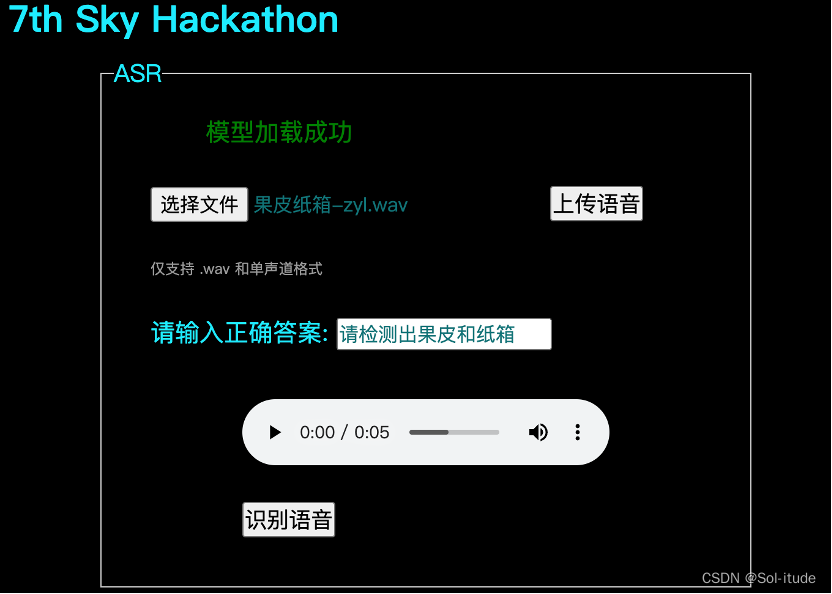
4. 优化UI界面 这一部分来自于我们团队中设计前端的同学
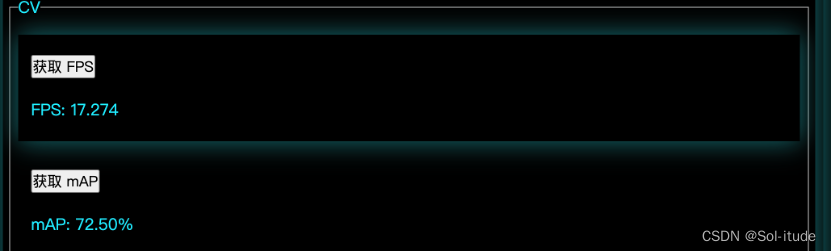
1 2 3 4 5 6 7 8 9 10 11 12 13 14 15 16 17 18 19 20 21 22 23 24 25 26 27 28 29 30 31 32 33 34 35 36 37 38 39 40 41 42 43 44 45 46 47 48 49 50 51 52 53 54 55 56 57 58 59 60 61 62 63 64 65 66 67 68 69 70 71 72 73 74 75 76 77 78 79 80 81 82 83 84 85 86 87 88 89 90 91 92 93 94 95 96 97 98 99 100 101 102 103 104 105 106 107 108 109 110 111 112 113 114 115 116 117 118 119 120 121 122 123 124 125 126 127 128 129 130 131 132 133 134 135 136 137 138 139 140 141 142 143 144 145 146 147 148 149 150 151 152 153 154 155 156 157 158 159 160 161 162 163 164 165 166 167 168 169 170 171 172 173 174 175 176 177 178 179 180 181 182 183 184 185 186 187 188 189 190 191 192 193 194 195 196 197 198 199 200 201 202 203 204 205 206 207 208 209 210 211 212 213 214 215 216 217 218 219 220 221 222 223 224 225 226 227 228 229 230 231 232 233 234 235 236 237 238 239 240 241 242 243 244 245 246 247 248 249 250 251 252 253 254 255 256 257 258 259 260 261 262 263 264 265 266 267 268 269 270 271 272 273 274 275 276 277 278 279 280 281 282 283 284 285 286 287 288 289 290 291 292 293 294 295 296 297 298 299 300 301 302 303 304 305 306 307 308 309 310 311 312 313 314 315 316 317 318 319 320 321 322 <html > <meta http-equiv ="content-type" content ="text/html; charset=UTF-8" > <head > <script src ="https://unpkg.com/vue@3" > </script > <script src ="https://unpkg.com/axios/dist/axios.min.js" > </script > <link rel ="stylesheet" type ="text/css" href ="/style.css" > <style > .image img { max-height : 600px ; } * { margin : 0 ; padding : 0 ; font-family : '微软雅黑' , sans-serif; box-sizing : border-box; } body { display : flex; justify-content : center; align-items : center; background : #000 ; min-height : 100vh ; } div { position : relative; padding : 10px 30px ; margin : 0 45px ; color : #21ebff ; text-decoration : none; font-size : 20px ; transition : 0.5s ; overflow : hidden; } div :hover { color : #21ebff ; box-shadow : 0 0 33px #0d7377 ; } div ::before { top : 0 ; left : 0 ; width : 10px ; height : 10px ; border-top : 2px solid #21ebff ; border-left : 2px solid #21ebff ; transition : 0.5s ; transition-delay : 0.5s ; } div :hover ::before { width : 100% ; height : 100% ; transition-delay : 0s ; } div ::after { right : 0 ; bottom : 0 ; width : 10px ; height : 10px ; border-bottom : 2px solid #21ebff ; border-right : 2px solid #21ebff ; transition : 0.5s ; transition-delay : 0.5s ; } div :hover ::after { width : 100% ; height : 100% ; transition-delay : 0s ; } button { color : black; font-family : '微软雅黑' , sans-serif; font-size : 18px ; } input { color : #0d7377 ; font-family : '微软雅黑' , sans-serif; font-size : 16px ; } </style > </head > <body id ="app" > <div class ="loading" v-if ="loading!=''" > <div class ="pad" > %%loading%%</div > </div > <div class ="content" > <h2 > 7th Sky Hackathon</h2 > <div class ="loaded" > <fieldset class ="asr" > <legend > ASR</legend > <button @click ="loadModel()" v-if ="!modelLoaded" style ="display:block;margin:0 auto" > 加载模型</button > <div v-if ="modelLoaded" class ="modelLoaded" > 模型加载成功</div > <div class ="field file" > <input type ="file" name ="file" ref ="file" @change ="handleFileUpload($event)" /> <button @click ="submitFile('asr')" > 上传语音</button > </div > <div class ="note" > 仅支持 .wav 和单声道格式</div > <div class ="field" > <label > 请输入正确答案: </label > <input type ="text" name ="defaultText" v-model ="defaultText" /> </div > <div class ="field" v-if ="asrStatus=='uploaded' || asrStatus=='identified'" > <div class ="audio" > <audio controls :src ="audioOriginal" > </audio > </div > <div class ="action" > <button @click ="identifyAudio()" > 识别语音</button > </div > </div > <div class ="field result asr" v-if ="asrStatus=='identified'" > <ul > <li v-for ="(value, key) in asrResult" > %%key%%: %%value%%</li > </ul > </div > </fieldset > <fieldset class ="cv" > <legend > CV</legend > <div class ="field" > <div class ="item action" > <button @click ="getFps()" class ="inline" > 获取 FPS</button > </div > <div class ="item result" > FPS: %%cvFps%%</div > </div > <div class ="field" > <div class ="item" > <button @click ="getMap()" class ="inline" > 获取 mAP</button > </div > <div class ="item result" > mAP: %%cvMap%%</div > </div > <div class ="field file" > <input type ="file" name ="file" ref ="file" @change ="handleFileUpload($event)" /> <button @click ="submitFile('cv')" > 上传图片</button > </div > <div class ="field" > <div class ="image original" v-if ="imageOriginal!=''" > <div class ="label" > 原图</div > <image :src ="imageOriginal" /> </div > <div class ="image result cv" v-if ="imageResult!=''" > <div class ="label" > 结果图</div > <image :src ="imageResult" /> </div > </div > <div class ="action" v-if ="imageOriginal!=''" > <button @click ="identifyImage()" > 识别图片</button > <br > </div > </fieldset > </div > </div > </body > <script > const { createApp } = Vue createApp ({ data ( return { file : '' , defaultText : '请检测瓶子' , modelLoaded : false , imageOriginal : '' , imageResult : '' , audioOriginal : '' , error : '' , asrResult : {}, cvMap : '' , cvFps : '' , loading : '' , asrStatus : 'pending' , cvStatus : 'pending' } }, compilerOptions : { delimiters : ["%%" , "%%" ] }, methods : { async loadModel ( if (this .loading != '' ) return showError ('在运行中,无法执行' ) this .loading = '加载模型中,请耐心等待...' this .modelLoaded = false try { var { data, status } = await axios.get ('/asr/load' ) if (status == 200 ) { this .modelLoaded = true } } catch (err) { showError (err.response .data ) } this .loading = '' }, async submitFile (fileType ) { let formData = new FormData () formData.append ('file' , this .file ) statusType = fileType + 'Status' this .loading = '上传中...' try { var { data, status } = await axios.post ('/' + fileType + '/upload' , formData, { headers : { 'Content-Type' : 'multipart/form-data' } }) if (status == 200 ) { this [statusType] = 'uploaded' if (fileType == 'cv' ) { this .imageOriginal = data } else { this .audioOriginal = data } } } catch (err) { showError (err.response .data ) } this .loading = '' }, handleFileUpload (event ) { this .file = event.target .files [0 ]; }, async identifyAudio (event ) { this .loading = '识别中...' try { let formData = new FormData () formData.append ('defaultText' , this .defaultText ) console .log ('t' , this .defaultText ) var result = await axios.post ('/asr/identify' , formData) this ['asrStatus' ] = 'identified' this .asrResult = result.data } catch (err) { if (err.response .status == 500 ) this .modelLoaded = false showError (err.response .data ) } this .loading = '' }, async identifyImage (event ) { if (this .loading != '' ) return showError ('在运行中,无法执行' ) this .loading = '识别中...' this .cvStatus = 'pending' try { var { data } = await axios.get ('/api/detect/image' ) this .imageResult = data['detection_result_image_path' ] } catch (err) { showError (err.response .data ) } this .loading = '' }, async getFps (event ) { if (this .loading != '' ) return showError ('在运行中,无法执行' ) this .loading = '获取 FPS...' try { var { data } = await axios.get ('/api/detect/fps' ) this .cvFps = data['detection_FPS' ] } catch (err) { showError (err.response .data ) } this .loading = '' }, async getMap (event ) { if (this .loading != '' ) return showError ('在运行中,无法执行' ) this .loading = '获取 mAP...' try { var { data } = await axios.get ('/api/detect/map' ) this .cvMap = data['detection_mAP' ] } catch (err) { showError (err.response .data ) } this .loading = '' } } }).mount ('#app' ) function showError (msg ) { alert (msg || '错误' ) } </script > </html >
总结 在这次比赛中,我们完整的做了一个深度学习的项目,从制作数据集开始,到训练神经网络,到最后部署到用户端,完整的实现了从0到1的过程。感觉这次比赛考察的能力非常多,从最开始的配置环境开始,就给我们出了一道难题,要从最基础的Linux操作学起,安装好双系统,再去配置环境,再去运行程序,从程序中的一条条error,去搜索,搜不到就去问,解决问题才有意义,从debug中一点一点前进,才能进步。