Arduino Uno零基础入门学习笔记——在LCD1602屏上显示温度和湿度
一、电路连接
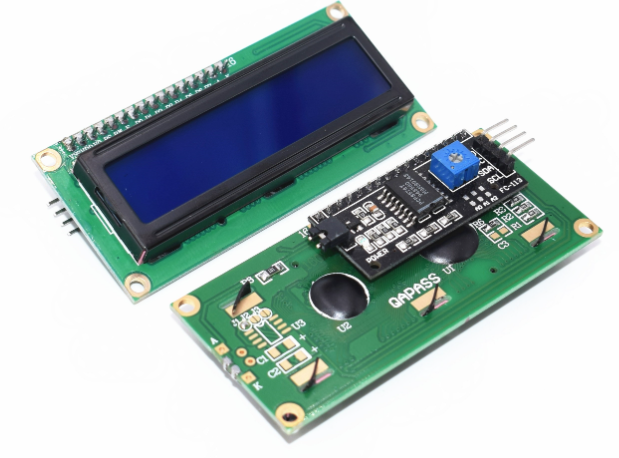
LCD1602IIC
| LCD1602IIC引脚 |
Arduino引脚 |
| VCC |
5V |
| GND |
GND |
| SDA |
A4 |
| SCL |
A5 |
我这里的LCD1602是IIC的,所以只需要4根线
1-WIRE
| 传感器引脚 |
Arduino引脚 |
| - |
GND |
| S |
8 |
| + |
5V |
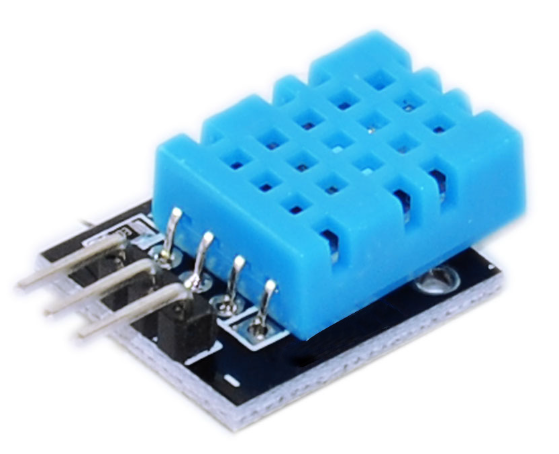
中间的线是要接5V的
二、程序
1
2
3
4
5
6
7
8
9
10
11
12
13
14
15
16
17
18
19
20
21
22
23
24
25
26
27
28
29
30
31
32
33
34
35
36
37
38
39
40
41
42
43
44
45
46
47
48
49
50
51
52
53
54
55
56
57
58
59
| #include <dht11.h>
#include <Wire.h>
#include <LiquidCrystal_I2C.h>
#define dht11Pin 8
dht11 dht;
LiquidCrystal_I2C lcd(0x27,16,2);
void setup()
{
Serial.begin(9600);
pinMode(dht11Pin, OUTPUT);
lcd.init();
lcd.backlight();
lcd.setCursor(0,0);
lcd.print(" Thermometer ");
delay(2000);
lcd.clear();
}
void loop()
{
SerialTem();
ther();
delay(1000);
}
void ther()
{
int tol = dht.read(dht11Pin);
int temp = (float)dht.temperature;
int humi = (float)dht.humidity;
lcd.setCursor(0,0);
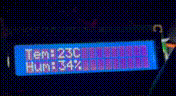
lcd.print("Tem:");
lcd.setCursor(4,0);
lcd.print(temp);
lcd.setCursor(6,0);
lcd.print("C");
lcd.setCursor(0,1);
lcd.print("Hum:");
lcd.setCursor(4,1);
lcd.print(humi);
lcd.setCursor(6,1);
lcd.print("%");
}
void SerialTem()
{
int tol = dht.read(dht11Pin);
int temp = (float)dht.temperature;
int humi = (float)dht.humidity;
Serial.print("Temperature:");
Serial.print(temp);
Serial.println(".C");
Serial.print("Humidity:");
Serial.print(humi);
Serial.println("%");
}
|
三、效果